Create an Extension
This documentation provides details about developing and deploying a new Syndesis extension. It uses the example of creating the validate EIP to illustrate how to create one. With this Step extension we will be able to validate any incoming message according to a configured rule. If the message does not match the rule the integration will raise an error.
In the rest of the document we will learn how to develop a custom extension and include the validate behavior, how to import it into Syndesis platform and finally how to use it in an integration.
Before you start to develop an extension, you should:
- Fork the Syndesis extension project and become familiar with its structure.
- Learn about Syndesis development.
- Read the Syndesis engineering guidelines.
Overview of how to develop an extension
Before you start to develop an extension, become familiar with the tasks that you will need to accomplish.
Prerequisites
- Familiarity with Maven
- Familiarity with Camel
- Experience programming
Maven project setup
We do already have a list of available extensions that you can use to inspire your development. You may fork the project and follow the same structure and even contribute with your extension by submitting a PR once your work is complete. The whole code for this example is already provided in the validate extension repository.
Everything start with a maven pom.xml file. We’ve created a module called syndesis-extension-validate under the extensions fork:
<?xml version="1.0" encoding="UTF-8"?>
<project xmlns="http://maven.apache.org/POM/4.0.0"
         xmlns:xsi="http://www.w3.org/2001/XMLSchema-instance"
         xsi:schemaLocation="http://maven.apache.org/POM/4.0.0 http://maven.apache.org/xsd/maven-4.0.0.xsd">

  <modelVersion>4.0.0</modelVersion>

  <parent>
    <groupId>io.syndesis.extensions</groupId>
    <artifactId>syndesis-extension-parent</artifactId>
    <version>1.0.0</version>
    <relativePath>../pom.xml</relativePath>
  </parent>

  <artifactId>syndesis-extension-validate</artifactId>
  <version>1.0.0</version>
  <name>Validate</name>
  <description>Add a validation based on a given rule</description>
  <packaging>jar</packaging>

  <dependencyManagement>
    <dependencies>
      <dependency>
        <groupId>io.syndesis.extension</groupId>
        <artifactId>extension-bom</artifactId>
        <version>${syndesis.version}</version>
        <type>pom</type>
        <scope>import</scope>
      </dependency>
    </dependencies>
  </dependencyManagement>

  <dependencies>
    <dependency>
      <groupId>io.syndesis.extension</groupId>
      <artifactId>extension-annotation-processor</artifactId>
      <optional>true</optional>
    </dependency>

    <!-- runtime -->
    <dependency>
      <groupId>io.syndesis.extension</groupId>
      <artifactId>extension-api</artifactId>
      <scope>provided</scope>
    </dependency>
  </dependencies>

  <build>
    <plugins>
      <plugin>
        <groupId>org.apache.maven.plugins</groupId>
        <artifactId>maven-compiler-plugin</artifactId>
        <version>${maven-compiler-plugin.version}</version>
        <configuration>
          <source>${java.version}</source>
          <target>${java.version}</target>
        </configuration>
      </plugin>
      <plugin>
        <groupId>io.syndesis.extension</groupId>
        <artifactId>extension-maven-plugin</artifactId>
        <version>${syndesis.version}</version>
        <executions>
          <execution>
            <goals>
              <goal>generate-metadata</goal>
              <goal>repackage-extension</goal>
            </goals>
          </execution>
        </executions>
      </plugin>
    </plugins>
  </build>
</project>
You can either extend syndesis-extension-parent or execute one of the maven archetype we have available. As an example:
mvn archetype:generate -DarchetypeGroupId=io.syndesis.extension -DarchetypeArtifactId=extension-archetype-javaThe Extensions available archetypes are extension-archetype-java, extension-archetype-spring-boot and extension-archetype-xml.
Development
Now we need to provide the validation logic. We have to develop a class implementing Step functional interface. We must annotate as @Action as well:
@Action(id = "validate", name = "validate", description = "Add a simple validation step to your exchange", tags = { "validate", "extension"})
public class ValidateAction implements Step {

    @ConfigurationProperty(
        name = "rule",
        displayName = "Validation rule",
        description = "The rule used to validate the incoming message",
        type = "String" ,
        required = true)
    private String rule;

    public String getRule(){
        return rule;
    }

    public void setRule(String rule){
        this.rule = rule;
    }

	@Override
    public Optional<ProcessorDefinition> configure(CamelContext context, ProcessorDefinition route, Map<String, Object> parameters) {
        ObjectHelper.notNull(route, "route");
        ObjectHelper.notNull(rule, "rule");

        return Optional.of(route.validate(predicate(rule)));
    }

}
Using @ConfigurationProperty annotation we are instructing the platform to provide all the configuration inputs required by the extension. We just need one in our case.
The configure() method is the place where to provide our business logic. In our case, as we’re implementing a well known EIP, we will leverage the presence of such logic on the Camel integration platform.
Notice that we’re expecting a Camel Simple language expression using the predicate() method. In general you can play with the route, context and parameters input provided by the method to perform the customization you need.
Now you should package your extension using the mvn package phase and the resulted jar library is what we’ll be importing into Syndesis.
Import the extension
Once you have your packaged dependency, you will be able to import it into Syndesis using the Customizations >> Extensions >> Import.
You can drag and drop or select the jar to import and the platform will provide a user interface with the details of the extension you’re about to import. If you’re satisfied with that, by accepting you will make the extension available to your platform.
Use the extension
As this extension is a Step, we will expect it to be available while creating an integration. As an example let’s create a Webhook to Log integration: we can select a Webhook connector as source and a Log connector as destination.
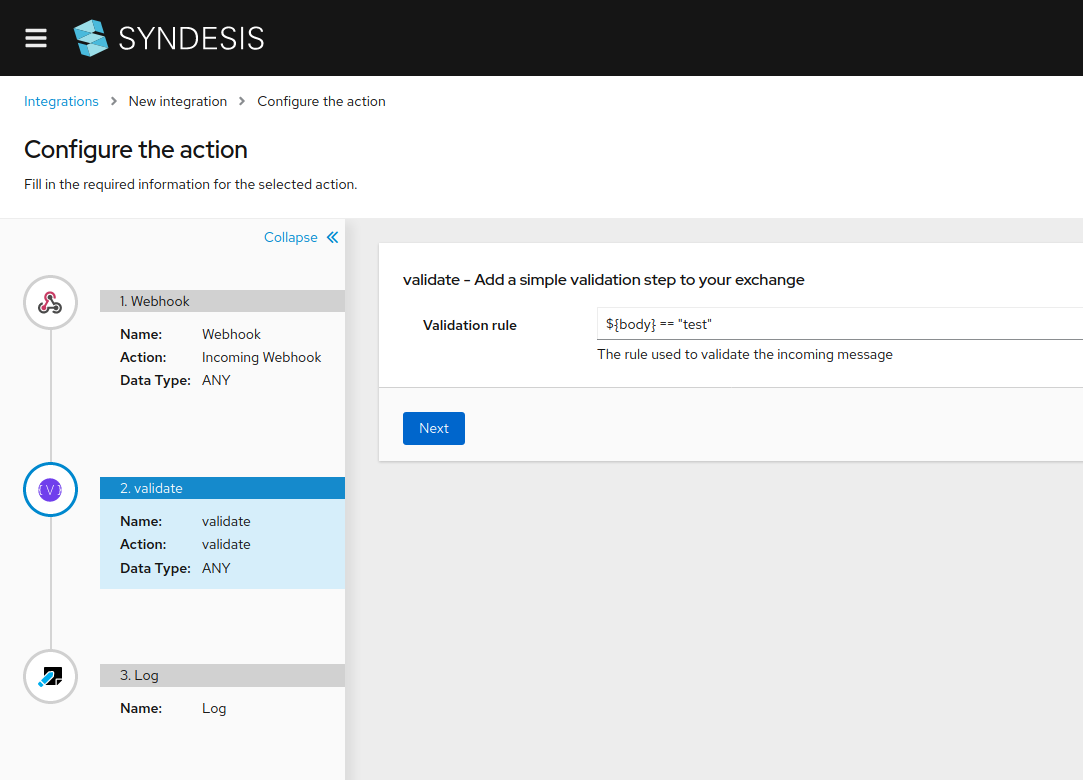
Once we’re done we include our extension step just in the middle:

Figure 1. Using the Validate Extension Step
We configure the rule with the Simple Language expression ${body} == "test" that will validate only the messages whose text received is equals to “test” text. The simple language is very powerful despite its name, you can play with body, headers and quite a few more resources.
Once we publish the integration we can provide some message to the webhook and you can notice that it will correctly log something only when the text will be the one expected, producing an error otherwise.