If Syndesis does not provide a feature that is needed to create an integration, then an expert developer can code an extension that provides the needed behavior. The Syndesis extension repository, https://github.com/syndesisio/syndesis-extensions, contains examples of extensions.
A business integrator shares requirements with a developer who codes the extension. The developer provides a .jar file that contains the extension. The business integrator uploads the .jar file in Syndesis to make the custom connector, custom step(s), or library resource available for use in Syndesis.
The Fuse Tooling plugin to Red Hat Developer Studio provides a wizard that helps you develop a step extension or a connector extension. It is a matter of personal preference whether you choose to develop a step extension or a connector extension in Developer Studio or in some other IDE. For information about using the Developer Studio plugin, see Developing extensions for Syndesis integrations.
In this document, the following topics outline the procedure, describe the requirements, and provide additional examples for developing extensions in an IDE that you choose.
General procedure for developing extensions
Before you start to develop an extension, become familiar with the tasks that you will need to accomplish.
Caution | An integration pod runs in a Java process with a flat classpath. To avoid version clashes, make sure that the dependencies that an extension uses are aligned with the imported bill of materials (BOM) from all of these sources:
If there are additional dependencies that are not part of the imported BOMs, you must:
|
Obtain an understanding of what the extended feature must do. Talk to your business colleague to understand the feature requirements.
Determine whether you need to develop a step extension, a connector extension, or a library extension.
Set up the Maven project in which to develop the extension.
If you are developing a step extension:
Decide whether to implement it as a Camel route or implement it by using the Syndesis
StepAPI. Information for the Syndesis API is at http://javadoc.io/doc/io.syndesis.extension/extension-api.If you choose to implement the extension as a Camel route, decide whether to implement XML fragments, a
RouteBuilderclass, or a bean.In your Maven project, specify the required metadata, such as the
schemaVersion, extensionname,extensionId, and so on.
Code the classes that implement the feature.
Add dependencies to the project’s
pom.xmlfile.For connector and library extensions, and for step extensions that you implement in XML, create the JSON file that defines the extension.
For step extensions that you implement in Java, Maven can generate the JSON extension definition file for you when you specify corresponding data structure values in your Maven project.
Run Maven to build the extension and create the extension’s JAR file.
Test the extension by uploading the JAR file to a Syndesis development environment.
Provide the JAR file that packages the extension to your business colleague, who uploads it to a Syndesis production environment. When you provide the JAR file, let your business colleague know about any configuration settings that require information beyond what appears in the Syndesis web interface.
Description of the kinds of extensions
An extension defines one of the following:
One or more custom steps that operate on integration data between connections. Each custom step performs one action. This is a step extension.
A library resource that an integration runtime uses. For example, a library extension can provide a JDBC driver for connecting to a proprietary SQL database, such as Oracle.
A single custom connector for creating connections to a particular application or service that you want to integrate. This is a connector extension.
NoteSyndesis can use an OpenAPI document to create a connector for a REST API client. See Develop a REST API client connector.
A business integrator shares requirements with a developer who codes the extension. The developer provides a .jar file that contains the extension. The business integrator uploads the .jar file in Syndesis to make the custom connector, custom step(s), or library resource available for use within Syndesis.
An extension .jar file that you upload to Syndesis always contains exactly one extension.
For an example of uploading and using an extension that provides a step that operates on data between connections, see the AMQ to REST API sample integration tutorial.
Overview of extension content and structure
An extension is a collection of classes, dependencies, and resources that are packaged in a .jar file.
Syndesis uses Spring Boot to load an extension. Consequently, you must package an extension according to Spring Boot’s executable JAR format. For example, ensure that you use the ZipEntry.STORED() method to save a nested JAR file.
The structure of a .jar file that packages an extension is as follows:
extension.jar
|
+- META-INF
|  |
|  +- syndesis
|     |
|     +- syndesis-extension-definition.json (1)
|
+- mycompany
|  |
|  +-project
|    |
|    +-YourClasses.class (2)
|
+- lib (3)
  |
  +-dependency1.jar
  |
  +-dependency2.jar
A JSON schema file that specifies the data structures that define the extension. This is referred to as the extension definition JSON file.
The Java classes that implement the behavior that the extension provides.
Additional dependencies that are required to build and execute the custom feature.
Requirements in an extension definition JSON file
Each extension must have a .json file that defines the extension by specifying values for data structures such as name, description, supported actions, and dependencies. For each extension type, the following table indicates whether Maven can generate the extension definition JSON file and which data structures are required.
| Extension Type | Maven Can Generate Extension Definition | Required Data Structures |
|---|---|---|
Step extension in Java | Yes |
|
Step extension in XML | No |
|
Connector extension | No |
|
Library extension | No |
|
*While specification of dependencies is not strictly required, in practice, there are almost always dependencies that you need to specify.
Typically, an extension definition file has the following layout:
{
  "schemaVersion": "v1",
  "name": "",
  "description": "",
  "version": "",
  "extensionId": "",
  "extensionType": "",
  "properties": {
  },
  "actions": [
  ],
  "dependencies": [
  ],
}
schemaVersion defines the version of the extension definition schema. Internally, Syndesis uses schemaVersion to determine how to map the extension definition to the internal model. This allows extensions that were developed against an old version of Syndesis to be deployed on newer versions of Syndesis.
name is the name of the extension. When you upload an extension to Syndesis, this name appears.
description is any useful information that you want to specify. Syndesis does not operate on this value.
version is for your convenience to help you distinguish updates to an extension. Syndesis does not operate on this value.
extensionId defines a unique ID for the extension. This should be unique at least across a Syndesis environment.
extensionType indicates to Syndesis what the extension provides. As of Syndesis version 1.3, the following extension types are supported:
StepsConnectorsLibraries
properties at the top level in a connector extension is required. It controls what Syndesis displays when a Syndesis user selects the connector to create a connection. This
propertiesobject contains a set of properties for each form control for creating a connection. For example:"myControlName": { "deprecated": true|false, "description": "", "displayName": "", "group": "", "kind": "", "label": "", "required": true|false, "secret": true|false, "javaType": "", "type": "", "defaultValue": "", "enum": { } }In connector extensions, nested
propertiesobjects define HTML form controls for configuring connection actions. In step extensions, theactionsobject contains apropertiesobject. Thepropertiesobject defines a set of properties for each form control for configuring the step. See also: Descriptions of user interface properties.actions defines the operations that a connector can perform or the operation that a step between connections can perform. Only connector and step extensions use actions that you specify. The format for an action specification looks like this:
{
    "id": "",
    "name": "",
    "description": "",
    "actionType": "step|connector",
    "descriptor": {
    }
}
id is a unique ID for the action. This should be unique at least within a Syndesis environment.
name is the action name that appears in Syndesis. An integrator sees this value as the name of a connection action or as the name of a step that operates on integration data between connections.
description is the action description that appears in Syndesis. Use this field to help the integrator understand what the action does.
actionType indicates whether the action is performed by a connection or a step that is between connections.
descriptor specifies nested attributes such as
kind,entrypoint,inputDataType,outputDatatypeand more.
dependencies defines the resources that this extension requires Syndesis to provide.
Define a dependency as follows:
{
  "type": "MAVEN",
  "id"   : "org.apache.camel:camel-telegram:jar:2.21.0"
}
type indicates the type of the dependency. Specify MAVEN. (It is expected that other types will be supported in the future.)
id is the ID of the Maven dependency, which is a Maven GAV.
Descriptions of user interface properties
In connector extensions and step extensions, specify user interface properties in the extension definition JSON file or in Java class files. The settings of these properties define the HTML form controls that Syndesis displays when a Syndesis user creates a connection, configures a connection action, or configures a step that is provided by the extension.
You must specify properties for each form control that you want to appear in the extension’s user interface in the Syndesis console. For each form control, specify some or all properties in any order.
In the JSON file that is part of the IRC connector, the top level properties object defines the HTML form controls that appear after a Syndesis user selects the IRC connector to create a connection. There are three sets of property definitions for three form controls: hostname, password, and port:
"properties": {
   "hostname": {
     "description": "IRC Server hostname",
     "displayName": "Hostname",
     "labelHint": "Hostname of the IRC server to connect to",
     "order": "1",
     "required": true,
     "secret": false,
     "type": "string"
   },
   "password": {
     "description": "IRC Server password",
     "displayName": "Password",
     "labelHint": "Required if IRC server requires it to join",
     "order": "3",
     "required": false,
     "secret": true,
     "type": "string"
   },
   "port": {
     "description": "IRC Server port",
     "displayName": "Port",
     "labelHint": "Port of the IRC server to connect to",
     "order": "2",
     "required": true,
     "secret": false,
     "tags": [],
     "type": "int"
   }
 },
Based on these property specifications, when a Syndesis user selects the IRC connector, Syndesis displays the following dialog. After the user enters values in the two required fields and clicks Next, Syndesis creates an IRC connection that is configured with the values that the Syndesis user enters.

properties objects in extension definition JSON filesIn a connector extension:
The toplevel
propertiesobject is required. It controls what Syndesis displays when a Syndesis user selects the connector to create a connection. Thispropertiesobject contains a set of properties for each form control for creating a connection.In the
actionsobject, there is apropertiesobject for each action. In each of thesepropertiesobjects, there is a set of properties for each form control for configuring that action.
In a step extension, the actions object contains a properties object. The properties object defines a set of properties for each form control for configuring the step. The JSON hierarchy looks like this:
"actions": [
   {
      ...

      "propertyDefinitionSteps": [
         {
            ...

            "properties":
               {
                  "control-ONE": {
                     "type": "string",
                     "displayName": "Topic Name",
                     "order": "2",
                     ...,
                     }

                  "control-TWO": {
                     "type": "boolean",
                     "displayName": "Urgent",
                     "order": "3",
                     ...
                     }

                  "control-THREE": {
                     "type": "textarea",
                     "displayName": "Comment",
                     "order": "1",
                     ...,
                     }
} } ]To define user interface form controls in Java files, import io.syndesis.extension.api.annotations.ConfigurationProperty in each class file that defines user configuration of a connection, action, or step. For each form control that you want the Syndesis console to display, specify the @ConfigurationProperty annotation, followed by a list of properties. For information about the properties that you can specify, see the user interface property reference table at the end of this section.
The following code shows property definitions for one form control. This code is in the example of developing a Camel route with RouteBuilder:
public class LogAction extends RouteBuilder {
    @ConfigurationProperty(
        name = "prefix",
        description = "The Log body prefix message",
        displayName = "Log Prefix",
        type = "string")
The following code shows property definitions for two controls. This code is from the example of using the Syndesis Step API:
@Action(id = "split", name = "Split", description = "Split your exchange")
public class SplitAction implements Step {

    @ConfigurationProperty(
        name = "language",
        displayName = "Language",
        description = "The language used for the expression")
    private String language;

    @ConfigurationProperty(
        name = "expression",
        displayName = "Expression",
        description = "The expression used to split the exchange
private String language;In the set of properties for each HTML form control, the type property defines the input type of the form control that Syndesis displays. For details about HTML form input types, see https://www.w3schools.com/html/html_form_input_types.asp.
The following table lists the possible input types for Syndesis form controls. In the set of properties for a control, if you specify a type value that is unknown, Syndesis displays an input field that accepts one line of text. That is, the default is "type": "text".
Value of type property | HTML | Syndesis displays |
|---|---|---|
|
| A checkbox that the user can select or not select. |
| A custom control that lets the Syndesis user select a unit of time: milliseconds, seconds, minutes, hours, or days. The user also enters a number and Syndesis returns a number of milliseconds. For example: | |
|
| This field does not appear in the Syndesis console. You can use other properties to specify data that is associated with this field, for example, textual data of some kind. While Syndesis users cannot see or modify this data, if a user selects View Source for a Syndesis page, hidden fields are visible in the source display. Therefore, do not use hidden fields for security purposes. |
|
| An input field that accepts a number. |
|
| An input field in which Syndesis masks the characters that the user enters, typically with asterisks. |
| A | A drop-down list with an entry for each label/value pair that you specify in the form control’s |
|
| An input field that accepts one line of text. |
|
| A textarea element is used |
In a connector or step extension, for each HTML form control that appears in the Syndesis console, you can specify one or more of the properties described in the following table. For details about HTML form input types, see https://www.w3schools.com/html/html_form_input_types.asp.
| Property name | Type | Description |
|---|---|---|
| string | Controls the kind of form control that Syndesis displays. See the previous table for details. |
| number | If set for a |
| string | If set, the value is mapped to the HTML |
| array | If the value of the |
| Varies according to the value of the | Syndesis initially displays this value in the form field. The type of the setting of the |
| string | If set, Syndesis displays this value below the form control. Typically, this is a short, useful message about the control. |
| string | Syndesis displays this value. |
| array | If set, Syndesis overrides any setting for the |
| string | If set, a |
| number | If set for a |
| number | If set for a |
| Boolean | If set to |
| number | Determines the order of controls in the Syndesis console. Syndesis applies ascending order, that is, the control that has |
| string | If set, Syndesis displays this value in a hazed font in an input field to help the user understand the expected input. |
| Boolean | Controls whether or not the |
| number | If the value of the |
| Boolean | If specified, Syndesis changes the setting of the control’s |
Description of Maven plugin that supports extensions
The extension-maven-plugin supports extension development by packaging the extension as a valid Spring Boot module. For step extensions that you implement in Java, this plugin can generate the extension definition JSON file.
In your Maven project’s pom.xml file, add the following plugin declaration:
<plugin>
    <groupId>io.syndesis.extension</groupId>
    <artifactId>extension-maven-plugin</artifactId>
    <version>${syndesis.version}</version>
    <executions>
        <execution>
        <goals>
            <goal>generate-metadata</goal>
            <goal>repackage-extension</goal>
        </goals>
        </execution>
    </executions>
</plugin>
The extension-maven-plugin defines the following goals:
generate-metadata generates the JSON extension definition file that will be in the generated JAR file as follows:
Maven starts with the data structure specifications that are in the
META-INF/syndesis/syndesis-extension-definition.jsonfile, if there is one.If you are coding in XML, then you must define the extension definition JSON file yourself and it must specify all required data structures.
If you are developing a connector or library extension, then you must define the extension definition JSON file yourself and it must specify all required data structures.
If you are developing a step extension in Java, you can:
Create the extension definition JSON file yourself.
In your Java code, specify annotations that define all required data structures. You do not create an extension definition JSON file.
Create an extension definition JSON file and specify some but not all data structures.
For step extensions that you develop in Java, Maven obtains missing specifications from code annotations
Maven adds the dependencies list, which specifies dependencies that are provided with a scope of
providedand that are managed through theextension-bom.
repackage-extension packages the extension.
Dependencies and related transitive dependencies that are not managed through the
extension-bomare in thelibfolder of the generated JAR.For library extensions, dependencies whose scope is
systemare in thelibfolder of the generated JAR.
For example, suppose your Maven project has the following pom.xml file:
<?xml version="1.0" encoding="UTF-8"?>
<project xmlns="http://maven.apache.org/POM/4.0.0"
         xmlns:xsi="http://www.w3.org/2001/XMLSchema-instance"
         xsi:schemaLocation="http://maven.apache.org/POM/4.0.0 http://maven.apache.org/xsd/maven-4.0.0.xsd">

  <modelVersion>4.0.0</modelVersion>
  <groupId>com.company</groupId>
  <artifactId>my-extension</artifactId>
  <version>1.0.0</version>
  <name>MyExtension</name>
  <description>A Sample Extension</description>
  <packaging>jar</packaging>

  <dependencyManagement>
    <dependencies>
      <dependency>
        <groupId>io.syndesis.extension</groupId>
        <artifactId>extension-bom</artifactId>
        <version>1.3.10</version>
        <type>pom</type>
        <scope>import</scope>
      </dependency>
    </dependencies>
  </dependencyManagement>

  <dependencies>
    <dependency>
      <groupId>io.syndesis.extension</groupId>
      <artifactId>extension-api</artifactId>
      <scope>provided</scope>
    </dependency>
    <dependency>
      <groupId>com.github.lalyos</groupId>
      <artifactId>jfiglet</artifactId>
      <version>0.0.8</version>
    </dependency>
  </dependencies>

  <build>
    <plugins>
      <plugin>
        <groupId>org.apache.maven.plugins</groupId>
        <artifactId>maven-compiler-plugin</artifactId>
        <version>3.7.0</version>
        <configuration>
          <source>1.8</source>
          <target>1.8</target>
        </configuration>
      </plugin>
      <plugin>
        <groupId>io.syndesis.extension</groupId>
        <artifactId>extension-maven-plugin</artifactId>
        <version>1.3.10</version>
        <executions>
          <execution>
            <goals>
              <goal>generate-metadata</goal>
              <goal>repackage-extension</goal>
            </goals>
          </execution>
        </executions>
      </plugin>
    </plugins>
  </build>
</project>
Based on this pom.xml file, the generated extension definition JSON file looks like this:
{
  "name": "MyExtension",
  "description": "A Sample Extension",
  "extensionId": "com.company:my-extension",
  "version": "1.0.0",
  "dependencies": [ {
    "type": "MAVEN",
    "id": "io.syndesis.extension:extension-api:jar:1.3.10"
  } ],
  "extensionType": "Libraries",
  "schemaVersion": "v1"
}
The generated archive has this structure and content:
my-extension-1.0.0.jar
|
+- lib
|  |
|  + jfiglet-0.0.8.jar
|
+- META-INF
  |
  +- MANIFEST.MF
     |
     +- syndesis
        |
        +- syndesis-extension-definition.json
How to specify data shapes in extensions
A data shape holds data type metadata for use by the data mapper. The data mapper transforms this metadata into internal documents that it uses to display the source and target data fields in the data mapper user interface. In an extension definition JSON file for a connector or for a custom step, each action specification defines an input data shape (inputDataShape) and an output data shape (outputDataShape).
When you are developing an extension, it is important to specify data shape properties that allow the data mapper to correctly handle and display the source and target fields. The following data shape properties affect data mapper behavior:
kindtypespecificationnamedescription
kind propertyThe data shape kind property is represented by the DataShapeKinds enum. The possible values for the kind property are:
javaindicates that the data type is represented by a Java class. Follow the"kind": "java"declaration by specifying a fully qualified class name for thetypeproperty. For example:"outputDataShape": { "kind": "java", "type": "org.apache.camel.component.telegram.model.IncomingMessage" },json-schemaindicates that the data type is represented by a JSON schema. Whenkindis set tojson-schema, specify a JSON schema as the value of the data shape’sspecificationproperty. For example:"inputDataShape": { "description": "Person data", "kind": "json-schema", "name": "Person", "specification": "{\"$schema\":\"http://json-schema.org/draft-04/schema#\",\"title\":\"Person\",\"type\":\"object\",\"properties\":{\"firstName\":{...}}}" }The code for the SAP Concur connector contains examples of data shapes that are specified by JSON schemas.
json-instanceindicates that the data type is represented by a JSON instance. Whenkindis set tojson-instance, specify a JSON instance as the value of the data shape’sspecificationproperty. For example:"inputDataShape": { "description": "Person data", "kind": "json-instance", "name": "Person", "specification": "{\"firstName\":\"John\",...}" }xml-schemaindicates that the data type is represented by an XML schema. Whenkindis set toxml-schema, specify an XML Schema as the value of the data shape’sspecificationproperty. For example:"inputDataShape": { "description": "Person data", "kind": "xml-schema", "name": "Person", "specification": "<?xml version=\"1.0\" encoding=\"UTF-8\" ?><xs:schema xmlns:xs=\"http://www.w3.org/2001/XMLSchema\">...</xs:schema>" }xml-instanceindicates that the data type is represented by an XML instance. Whenkindis set toxml-instance, specify an XML instance as the value of the data shape’sspecificationproperty. For example:"inputDataShape": { "description": "Person data", "kind": "xml-instance", "name": "Person", "specification": "<?xml version=\"1.0\" encoding=\"UTF-8\" ?><Person><firstName>Jane</firstName></Person>" }anyindicates that the data type is not structured. For example, it might be a byte array or free format text. The data mapper ignores a data shape when itskindproperty is set toany. In other words, the data does not appear in the data mapper and therefore you cannot map any fields to or from this data.However, for a custom connector, when its
kindproperty is set toany, Syndesis prompts you to specify input and/or output data types when you configure a connection that you have created from the custom connector. This happens when you add a connection to an integration. You can specify the kind of the data shape’s schema, an appropriate document for the kind of schema that you specify, and a name for the data type.noneindicates that there is no data type. For an input data shape, this indicates that the connection or step does not read data. For an output data shape, this indicates that the connection or step does not modify data. For example, when an input message body is being transferred to an output message body, setting thekindproperty tononeindicates that the data is only passing through. The data mapper ignores data shapes whenkindis set tonone. In other words, the data does not appear in the data mapper and therefore you cannot map any fields to or from this data.
type propertyWhen the value of the kind property is java, the "kind": "java" declaration is followed by a type declaration that specifies a fully qualified Java class name. For example:
"outputDataShape": {
     "kind": "java",
     "type": "org.apache.camel.component.telegram.model.IncomingMessage"
},When the kind property is set to anything other than java then any setting for the type property is ignored.
specification propertyThe setting of the kind property determines the setting of the specification property, as shown in the following table.
kind property setting | specification property setting |
|---|---|
| Java inspection result. For each extension that you write in Java, use As a reminder, for step extensions written in Java, |
| An actual JSON schema document. The setting cannot be a reference to a document and the JSON schema cannot point to other JSON schema documents by means of references. |
| An actual JSON document that contains example data. The data mapper derives the data types from the example data. The setting cannot be a reference to a document. |
| An actual XML schema document. The setting cannot be a reference to a document and the XML schema cannot point to other XML schema documents by means of references. |
| An actual XML instance document. The setting cannot be a reference to a document. |
| The |
| The |
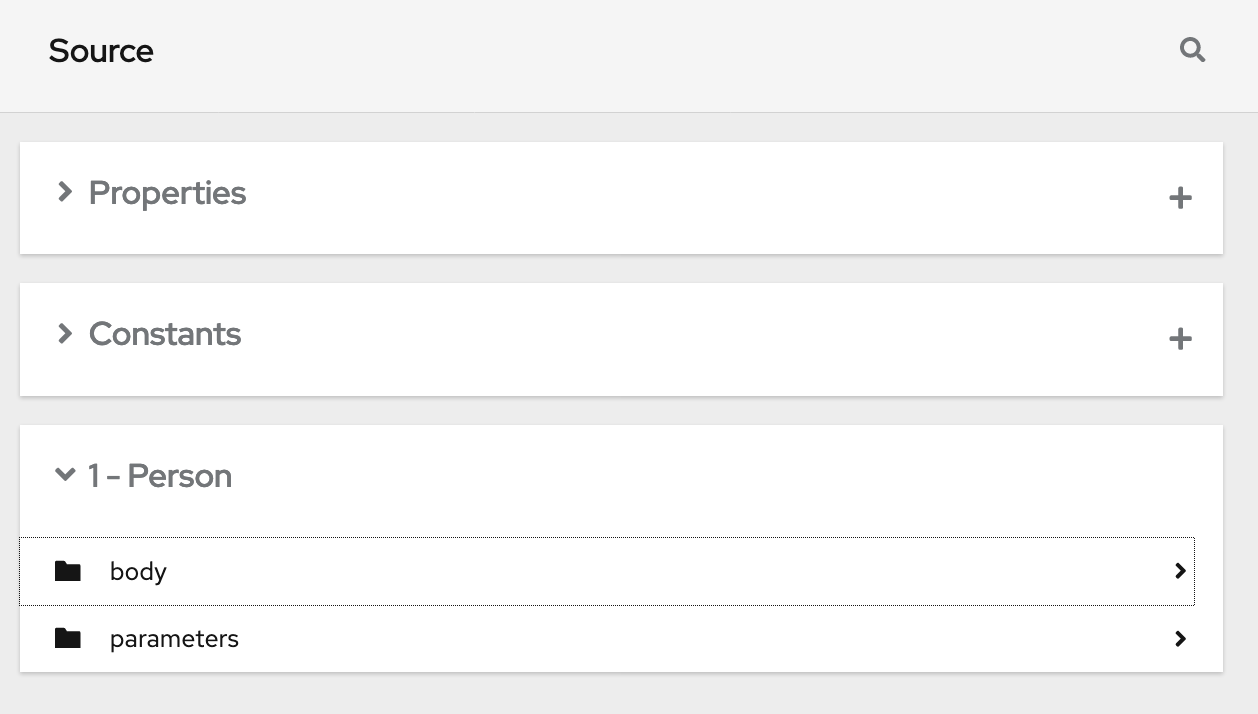
name propertyThe data shape name property specifies a human readable name for the data type. The data mapper displays this name in its user interface as the label for the data fields. In the following image, Person is an example of where you would see the value of the name property.
This name also appears in data type indicators in the Syndesis flow visualization.
description propertyThe data shape description property specifies text that appears as a tooltip when the cursor hovers over the data type name in the data mapper user interface.
Examples of developing step extensions
A step extension implements one or more custom steps. Each custom step implements one action for processing integration data between connections. The following examples demonstrate the alternatives for developing step extensions:
Syndesis provides custom Java annotations that you can use in conjunction with the syndesis-extension-plugin. When you implement a step extension or a connector extension in Java, you can specify annotations that enable Maven to add action definitions to the extension definition JSON file. To enable annotation processing, add the following dependency to your Maven project:
<dependency>
  <groupId>io.syndesis.extension</groupId>
  <artifactId>extension-annotation-processor</artifactId>
  <optional>true</optional>
</dependency>
Because Spring Boot is the integration runtime, to inject beans into a Camel context, be sure to follow standard Spring Boot practices. For example, create an auto configuration class and create beans there. However, the default behavior is that extension code is not subject to package scanning. Consequently, you must create and populate the META-INF/spring.factories file in a step extension.
Example of developing a Camel route with XML fragments
To develop a custom step, you can implement the action as an XML fragment that is a Camel route that has an input such as direct. The Syndesis runtime invokes this route in the same way that it invokes any other Camel route.
For example, suppose that you want to create a step that logs the body of a message with an optional prefix. The following XML defines a Camel route that does this.
<?xml version="1.0" encoding="UTF-8"?>
<routes xmlns="http://camel.apache.org/schema/spring"
    xmlns:xsi="http://www.w3.org/2001/XMLSchema-instance"
    xsi:schemaLocation="
      http://camel.apache.org/schema/spring
      http://camel.apache.org/schema/spring/camel-spring.xsd">

  <route id="log-body-with-prefix">
    <from uri="direct:log"/>
    <choice>
      <when>
        <simple>${header.prefix} != ''</simple>
        <log message="${header.prefix} ${body}"/>
      </when>
      <otherwise>
        <log message="Output ${body}"/>
      </otherwise>
    </choice>
  </route>

</routes>
When you develop an extension in XML, you must create the extension definition JSON file yourself. For this XML fragment, the src/main/resources/META-INF/syndesis/syndesis-extension-definition.json file could define the action as follows:
{
  "actionType": "step",
  "id": "log-body-with-prefix",
  "name": "Log body with prefix",
  "description": "A simple body log with a prefix",
  "descriptor": {
    "kind": "ENDPOINT", (1)
    "entrypoint": "direct:log", (2)
    "resource": "classpath:log-body-action.xml", (3)
    "inputDataShape": {
      "kind": "none"
    },
    "outputDataShape": {
      "kind": "none"
    },
  "propertyDefinitionSteps": [ {
    "description": "extension-properties",
    "name": "extension-properties",
    "properties": { (4)
      "prefix": {
        "componentProperty": false,
        "deprecated": false,
        "description": "The Log body prefix message",
        "displayName": "Log Prefix",
        "javaType": "String",
        "kind": "parameter",
        "required": false,
        "secret": false,
        "type": "string"
      }
    }
  } ]
  }
}
The type of the action is set to
ENDPOINT. The runtime invokes a Camel endpoint to execute the action provided by this custom step.The Camel endpoint to invoke is
direct:log. This is thefromspecification in the route.This is the location of the XML fragment.
These are the properties that the action defined in this custom step exposes to the integrator who will be adding this step to an integration. In Syndesis, each value that the integrator specifies in the user interface gets mapped to a message header that has the same name as the property. In this example, the integrator will see one input field, with the Log Prefix display name. For more details, see Descriptions of user interface properties.
Warning | Syndesis does not support full Camel XML configuration. Syndesis supports only the <routes> tag. |
Example of developing a Camel route with RouteBuilder
You can implement a custom step by developing an action as a Camel route with the support of the RouteBuilder class. Such a route has an input such as direct. Syndesis invokes this route in the same way that it invokes any other Camel route.
To implement the example that creates a step that logs the body of a message with an optional prefix, you can write something like this:
import org.apache.camel.builder.RouteBuilder;

import io.syndesis.extension.api.annotations.Action;
import io.syndesis.extension.api.annotations.ConfigurationProperty;

@Action( // (1)
    id = "log-body-with-prefix",
    name = "Log body with prefix",
    description = "A simple body log with a prefix",
    entrypoint = "direct:log")
public class LogAction extends RouteBuilder {
    @ConfigurationProperty( // (2)
        name = "prefix",
        description = "The Log body prefix message",
        displayName = "Log Prefix",
        type = "string")
    private String prefix;

    @Override
    public void configure() throws Exception {
        from("direct::start") // (3)
            .choice()
                .when(simple("${header.prefix} != ''"))
                    .log("${header.prefix} ${body}")
                .otherwise()
                    .log("Output ${body}")
            .endChoice();
    }
}
The
@Actionannotation indicates the action definition.The
@ConfigurationPropertyannotation indicates definitions of user interface form controls. For details, see Descriptions of user interface properties.This is the action implementation.
This Java code uses Syndesis annotations, which means that the extension-maven-plugin can automatically generate the action definition. In the extension definition JSON file, the action definition will look like this:
{
  "id": "log-body-with-prefix",
  "name": "Log body with prefix",
  "description": "A simple body log with a prefix",
  "descriptor": {
    "kind": "ENDPOINT", (1)
    "entrypoint": "direct:log", (2)
    "resource": "class:io.syndesis.extension.log.LogAction", (3)
    "inputDataShape": {
      "kind": "none"
    },
    "outputDataShape": {
      "kind": "none"
    },
    "propertyDefinitionSteps": [ {
      "description": "extension-properties",
      "name": "extension-properties",
      "properties": { (4)
        "prefix": {
          "componentProperty": false,
          "deprecated": false,
          "description": "The Log body prefix message",
          "displayName": "Log Prefix",
          "javaType": "java.lang.String",
          "kind": "parameter",
          "required": false,
          "secret": false,
          "type": "string",
          "raw": false
        }
      }
    } ]
  },
  "actionType": "step"
}
The type of action is
ENDPOINT. The runtime invokes a Camel endpoint to execute the action that this step implements.This is the Camel endpoint to invoke. It is the
fromspecification in the route.This is the class that implements
RoutesBuilder.These are the properties that the action defined in this custom step exposes to the integrator who will be adding this step to an integration. In Syndesis, each value that the integrator specifies in the user interface gets mapped to a message header that has the same name as the property. In this example, the integrator will see one input field, with the Log Prefix display name. For more information, see Descriptions of user interface properties.
Example of developing a Camel route with RouteBuilder and Spring Boot
You can implement a custom step by developing an action as a Camel route with the support of the RouteBuilder class as well as Spring Boot. In this example, Spring Boot is the facility for registering a RouteBuilder object in a Camel context. Syndesis invokes this route in the same way that it invokes any other Camel route.
To implement the example that creates a step that logs the body of a message with an optional prefix, you can write something like this:
import io.syndesis.extension.api.annotations.Action;
import io.syndesis.extension.api.annotations.ConfigurationProperty;
import org.apache.camel.builder.RouteBuilder;
import org.springframework.context.annotation.Bean;
import org.springframework.context.annotation.Configuration;

@Configuration
public class ActionsConfiguration {

    @Action( // (1)
        id = "log-body-with-prefix",
        name = "Log body with prefix",
        description = "A simple body log with a prefix",
        entrypoint = "direct:log")
    @ConfigurationProperty( // (2)
        name = "prefix",
        description = "The Log body prefix message",
        displayName = "Log Prefix",
        type = "string")
    @Bean // (3)
    public RouteBuilder logBodyWithprefix() {
        return new RouteBuilder() {
            @Override
            public void configure() throws Exception {
                from("direct::start") // (4)
                    .choice()
                        .when(simple("${header.prefix} != ''"))
                            .log("${header.prefix} ${body}")
                        .otherwise()
                            .log("Output ${body}")
                    .endChoice();
             }
        };
    }
}
The
@Actionannotation indicates the action definition.The
@ConfigurationPropertyannotation indicates definitions of user interface form controls. For details, see Descriptions of user interface properties.Register the
RouteBuilderobject as a bean.This is the action implementation.
This Java code uses Syndesis annotations, which means that the extension-maven-plugin can automatically generate the action definition. In the extension definition JSON file, the action definition will look like this:
{
  "id": "log-body-with-prefix",
  "name": "Log body with prefix",
  "description": "A simple body log with a prefix",
  "descriptor": {
    "kind": "ENDPOINT", (1)
    "entrypoint": "direct:log", (2)
    "inputDataShape": {
      "kind": "none"
    },
    "outputDataShape": {
      "kind": "none"
    },
    "propertyDefinitionSteps": [ {
      "description": "extension-properties",
      "name": "extension-properties",
      "properties": { (3)
        "prefix": {
          "componentProperty": false,
          "deprecated": false,
          "description": "The Log body prefix message",
          "displayName": "Log Prefix",
          "javaType": "java.lang.String",
          "kind": "parameter",
          "required": false,
          "secret": false,
          "type": "string",
          "raw": false
        }
      }
    } ]
  },
  "actionType": "step"
}
The type of action is
ENDPOINT. The runtime invokes a Camel endpoint to execute the action that this step implements.This is the Camel endpoint to invoke. It is the
fromspecification in the route.These are the properties that the action defined in this custom step exposes to the integrator who will be adding this step to an integration. In Syndesis, each value that the integrator specifies in the user interface gets mapped to a message header that has the same name as the property. In this example, the integrator will see one input field, with the Log Prefix display name. For more details, see Descriptions of user interface properties.
Important | To make configuration classes discoverable by Spring Boot, you must list them in a file named
|
With Spring Boot, every bean that you eventually register in your configuration classes is available to the Camel context. For details, see the Spring Boot documentation for Creating your own auto-configuration.
Example of using a Camel bean
You can implement a custom step by developing an action as a Camel bean processor. To implement the example that creates a step that logs the body of a message with an optional prefix, you can write something like this:
import org.apache.camel.Body;
import org.apache.camel.Handler;
import org.apache.camel.Header;
import org.slf4j.Logger;
import org.slf4j.LoggerFactory;

import io.syndesis.extension.api.annotations.Action;
import io.syndesis.extension.api.annotations.ConfigurationProperty;

@Action(
    id = "log-body-with-prefix",
    name = "Log body with prefix",
    description = "A simple body log with a prefix")
public class LogAction  {
    private static final Logger LOGGER = LoggerFactory.getLogger(LogAction.class);

    @ConfigurationProperty(
        name = "prefix",
        description = "The Log body prefix message",
        displayName = "Log Prefix",
        type = "string")
    private String prefix;

    @Handler // (1)
    public void process(@Header("prefix") String prefix, @Body Object body) {
        if (prefix == null) {
            LOGGER.info("Output {}", body);
        } else {
            LOGGER.info("{} {}", prefix, body);
        }
    }
}
This is the function that implements the action.
This Java code uses Syndesis annotations, which means that the extension-maven-plugin can automatically generate the action definition. In the extension definition JSON file, the action definition will look like this:
{
  "id": "log-body-with-prefix",
  "name": "Log body with prefix",
  "description": "A simple body log with a prefix",
  "descriptor": {
    "kind": "BEAN", (1)
    "entrypoint": "io.syndesis.extension.log.LogAction::process", (2)
    "inputDataShape": {
      "kind": "none"
    },
    "outputDataShape": {
      "kind": "none"
    },
    "propertyDefinitionSteps": [ {
      "description": "extension-properties",
      "name": "extension-properties",
      "properties": {
        "prefix": { (3)
          "componentProperty": false,
          "deprecated": false,
          "description": "The Log body prefix message",
          "displayName": "Log Prefix",
          "javaType": "java.lang.String",
          "kind": "parameter",
          "required": false,
          "secret": false,
          "type": "string",
          "raw": false
        }
      }
    } ]
  },
  "actionType": "step"
}
The type of the action is
BEAN. The runtime invokes a Camel bean processor to execute the action in this custom step.This is the Camel bean to invoke.
These are the properties that the action defined in this custom step exposes to the integrator who will be adding this step to an integration. In Syndesis, each value that the integrator specifies in the user interface gets mapped to a message header that has the same name as the property. In this example, the integrator will see one input field, with the Log Prefix display name. For more details, see Descriptions of user interface properties.
When you use beans, you might find it convenient to inject user properties into the bean instead of retrieving them from the exchange header. To do this, implement getter and setter methods for the properties that you want to get injected. The action implementation would look like this:
import org.apache.camel.Body;
import org.apache.camel.Handler;
import org.slf4j.Logger;
import org.slf4j.LoggerFactory;

import io.syndesis.extension.api.annotations.Action;
import io.syndesis.extension.api.annotations.ConfigurationProperty;

@Action(
    id = "log-body-with-prefix",
    name = "Log body with prefix",
    description = "A simple body log with a prefix")
public class LogAction  {
    private static final Logger LOGGER = LoggerFactory.getLogger(LogAction.class);

    @ConfigurationProperty(
        name = "prefix",
        description = "The Log body prefix message",
        displayName = "Log Prefix",
        type = "string")
    private String prefix;

    public void setPrefix(String prefix) { // (1)
        this.prefix = prefix;
    }

    public String getPrefix() { // (2)
        return prefix;
    }

    @Handler
    public void process(@Body Object body) {
        if (this.prefix == null) {
            LOGGER.info("Output {}", body);
        } else {
            LOGGER.info("{} {}", this.prefix, body);
        }
    }
}
This is the property setter method.
This is the property getter method.
Example of using the Syndesis Step API
You can implement a custom step by using the Syndesis Step API. This provides a way to interact with runtime route creation. You can use any method provided by the ProcessorDefinition class and you can create more complex routes. Information for the Syndesis API is at http://javadoc.io/doc/io.syndesis.extension/extension-api.
Here is an example of a step extension that uses the Syndesis Step API to implement a split action:
import java.util.Map;
import java.util.Optional;

import io.syndesis.extension.api.Step;
import io.syndesis.extension.api.annotations.Action;
import io.syndesis.extension.api.annotations.ConfigurationProperty;
import org.apache.camel.CamelContext;
import org.apache.camel.model.ProcessorDefinition;
import org.apache.camel.util.ObjectHelper;
import org.apache.camel.Expression;
import org.apache.camel.builder.Builder;
import org.apache.camel.processor.aggregate.AggregationStrategy;
import org.apache.camel.processor.aggregate.UseOriginalAggregationStrategy;
import org.apache.camel.spi.Language;

@Action(id = "split", name = "Split", description = "Split your exchange")
public class SplitAction implements Step {

    @ConfigurationProperty(
        name = "language",
        displayName = "Language",
        description = "The language used for the expression")
    private String language;

    @ConfigurationProperty(
        name = "expression",
        displayName = "Expression",
        description = "The expression used to split the exchange")
    private String expression;

    public String getLanguage() {
        return language;
    }

    public void setLanguage(String language) {
        this.language = language;
    }

    public String getExpression() {
        return expression;
    }

    public void setExpression(String expression) {
        this.expression = expression;
    }

    @Override
    public Optional<ProcessorDefinition> configure(
            CamelContext context,
            ProcessorDefinition route,
            Map<String, Object> parameters) { // (1)

        String languageName = language;
        String expressionDefinition = expression;

        if (ObjectHelper.isEmpty(languageName) && ObjectHelper.isEmpty(expressionDefinition)) {
            route = route.split(Builder.body());
        } else if (ObjectHelper.isNotEmpty(expressionDefinition)) {

            if (ObjectHelper.isEmpty(languageName)) {
                languageName = "simple";
            }

            final Language splitLanguage = context.resolveLanguage(languageName);
            final Expression splitExpression = splitLanguage.createExpression(expressionDefinition);
            final AggregationStrategy aggreationStrategy = new UseOriginalAggregationStrategy(null, false);

            route = route.split(splitExpression).aggregationStrategy(aggreationStrategy);
        }

        return Optional.of(route);
    }
}
This is the implementation of the action that the custom step performs.
This Java code uses Syndesis annotations, which means that the extension-maven-plugin can automatically generate the action definition. In the extension definition JSON file, the action definition will look like this:
{
  "id": "split",
  "name": "Split",
  "description": "Split your exchange",
  "descriptor": {
    "kind": "STEP", (1)
    "entrypoint": "io.syndesis.extension.split.SplitAction", (2)
    "inputDataShape": {
      "kind": "none"
    },
    "outputDataShape": {
      "kind": "none"
    },
    "propertyDefinitionSteps": [ {
      "description": "extension-properties",
      "name": "extension-properties",
      "properties": {
        "language": {
          "componentProperty": false,
          "deprecated": false,
          "description": "The language used for the expression",
          "displayName": "Language",
          "javaType": "java.lang.String",
          "kind": "parameter",
          "required": false,
          "secret": false,
          "type": "string",
          "raw": false
        },
        "expression": {
          "componentProperty": false,
          "deprecated": false,
          "description": "The expression used to split the exchange",
          "displayName": "Expression",
          "javaType": "java.lang.String",
          "kind": "parameter",
          "required": false,
          "secret": false,
          "type": "string",
          "raw": false
        }
      }
    } ]
  },
  "tags": [],
  "actionType": "step"
}
The type of the action is
STEP.This is the class that is implementing the
Stepinterface.
For details about user interface properties, see Descriptions of user interface properties.
Example of developing a connector extension
If Syndesis does not provide a connector for the application or service that you want to connect to in an integration, an experienced developer can code an extension that contributes a new connector to Syndesis. This documentation provides an introduction to developing a connector extension. For details about developing a connector, see Developing Syndesis connectors on the Syndesis community site.
Important | For connector extensions, it is not yet possible to automatically generate the extension definition JSON file from Java code. |
A connector is essentially a proxy for a Camel component. A connector configures the underlying component and creates endpoints according to options that are defined in the extension definition and in user-supplied options that the Syndesis web interface collects.
The connector extension definition extends the extension definition that is required for step extensions with the following additional data structures:
componentSchemeDefines the Camel component that the connector uses. You can set
componentSchemefor the connector or for actions. If you setcomponentSchemefor both the connector and an action, the setting for the action has precedence.connectorCustomizersSpecifies a list of classes that implement the ComponentProxyCustomizer class. Each class customizes the behavior of a connector. For example, a class might manipulate properties before they are applied to the underlying component/endpoint, or a class might add pre/post endpoint logic. For each class, specify the full class name of the implementation, for example,
com.mycomponent.MyCustomizer. You can setconnectorCustomizerson actions as well as connectors. According to what is set, Syndesis applies customizers to the connector first and then to actions.connectorFactoryDefines the class that implements the ComponentProxyFactory class, which creates and/or configures the underlying component/endpoint. Specify the full class name of the implementation. You can set
connectorFactoryfor the connector or for actions. Actions have precedence.
The following customizer example sets up a DataSource from individual options:
public class DataSourceCustomizer implements ComponentProxyCustomizer, CamelContextAware {
    private final static Logger LOGGER = LoggerFactory.getLogger(DataSourceCustomizer.class);

    private CamelContext camelContext;

    @Override
    public void setCamelContext(CamelContext camelContext) { // (1)
        this.camelContext = camelContext;
    }

    @Override
    public CamelContext getCamelContext() { // (1)
        return this.camelContext;
    }

    @Override
    public void customize(ComponentProxyComponent component, Map<String, Object> options) {
        if (!options.containsKey("dataSource")) {
            if (options.containsKey("user") && options.containsKey("password") && options.containsKey("url")) {
                try {
                    BasicDataSource ds = new BasicDataSource();

                    consumeOption(camelContext, options, "user", String.class, ds::setUsername); // (2)
                    consumeOption(camelContext, options, "password", String.class, ds::setPassword); // (2)
                    consumeOption(camelContext, options, "url", String.class, ds::setUrl); // (2)

                    options.put("dataSource", ds);
                } catch (@SuppressWarnings("PMD.AvoidCatchingGenericException") Exception e) {
                    throw new IllegalArgumentException(e);
                }
            } else {
                LOGGER.debug("Not enough information provided to set-up the DataSource");
            }
        }
    }
}
By implementing
CamelContextAware, Syndesis injects the Camel context and then invokes the customize method.Processes options and then removes them from the options map.
If the customizer respects Java bean conventions, you can also inject the properties, as shown in this revision of the previous example:
public class DataSourceCustomizer implements ComponentProxyCustomizer, CamelContextAware {
    private final static Logger LOGGER = LoggerFactory.getLogger(DataSourceCustomizer.class);

    private CamelContext camelContext;
    private String userName;
    private String password;
    private String url;

    @Override
    public void setCamelContext(CamelContext camelContext) { // (1)
        this.camelContext = camelContext;
    }

    @Override
    public CamelContext getCamelContext() { // (1)
        return this.camelContext;
    }

    public void setUserName(String userName) { //(1)
      this.userName = userName;
    }

    public String getUserName() { // (2)
      return this.userName;
    }

    public void setPassword(String password) { // (2)
      this.password = password;
    }

    public String getPassword() { // (2)
      return this.password;
    }

    public void setUrl(String url) { // (2)
      this.url = url;
    }

    public String getUrl() { // (2)
      return this.url;
    }

    @Override
    public void customize(ComponentProxyComponent component, Map<String, Object> options) {
        if (!options.containsKey("dataSource")) {
            if (userName != null && password != null && url != null) {
                try {
                    BasicDataSource ds = new BasicDataSource();
                    ds.setUserName(userName);
                    ds.setPassword(password);
                    ds.setUrl(url);

                    options.put("dataSource", ds);
                } catch (@SuppressWarnings("PMD.AvoidCatchingGenericException") Exception e) {
                    throw new IllegalArgumentException(e);
                }
            } else {
                LOGGER.debug("Not enough information provided to set-up the DataSource");
            }
        }
    }
}
By implementing
CamelContextAware, Syndesis injects the Camel context and then invokes the customize method. This sample code overrides thesetCamelContext()andgetCamelContext()methods, and sets the user name.The sample code processes the injected options and automatically removes them from the options map.
You can use a customizer to configure before/after logic as shown in this example:
public class AWSS3DeleteObjectCustomizer implements ComponentProxyCustomizer {
  	private String filenameKey;

    public void setFilenameKey(String filenameKey) {
      this.filenameKey = filenameKey;
    }

    public String getFilenameKey() {
        return this.filenameKey;
    }

    @Override
    public void customize(ComponentProxyComponent component, Map<String, Object> options) {
      	component.setBeforeProducer(this::beforeProducer);
    }

    public void beforeProducer(final Exchange exchange) throws IOException {
      	exchange.getIn().setHeader(S3Constants.S3_OPERATION, S3Operations.deleteObject);

    	  if (filenameKey != null) {
    		    exchange.getIn().setHeader(S3Constants.KEY, filenameKey);
    	  }
    }
}ComponentProxyComponentThe ComponentProxyFactory class creates and/or configures the underlying component/endpoint. To customize the behavior of the ComponentProxyComponent object that ComponentProxyFactory creates, you can override any of the following methods:
createDelegateComponent()Syndesis invokes this method when the proxy starts and it is used to eventually create a dedicated instance of the component with the scheme defined by the
componentSchemeoption.The default behavior of this method is to determine if any of the connector/action options applies at the component level. Only in the case that the same option cannot be applied at the endpoint, the method creates a custom component instance and configures it according to the applicable options.
configureDelegateComponent()Syndesis invokes this method only if a custom component instance has been created to configure additional behavior of the delegated component instance.
createDelegateEndpoint()Syndesis invokes this method when the proxy creates the endpoint and by default creates the endpoint by using Camel catalog facilities.
configureDelegateEndpoint()After the delegated endpoint has been created, Syndesis invokes this method to configure additional behavior of the delegated endpoint instance, for example:
public class IrcComponentProxyFactory implements ComponentProxyFactory {

    @Override
    public ComponentProxyComponent newInstance(String componentId, String componentScheme) {
        return new ComponentProxyComponent(componentId, componentScheme) {
            @Override
            protected void configureDelegateEndpoint(ComponentDefinition definition, Endpoint endpoint, Map<String, Object> options) throws Exception {
                if (!(endpoint instanceof IrcEndpoint)) {
                    throw new IllegalStateException("Endpoint should be of type IrcEndpoint");
                }

                final IrcEndpoint ircEndpoint = (IrcEndpoint)endpoint;
                final String channels = (String)options.remove("channels");

                if (ObjectHelper.isNotEmpty(channels)) {
                    ircEndpoint.getConfiguration().setChannel(
                        Arrays.asList(channels.split(","))
                    );
                }
            }
        };
    }
}
How to develop library extensions
A library extension provides a resource that an integration requires at runtime. A library extension does not contribute steps or connectors to Syndesis.
When you save an integration, you can optionally select one or more imported library extensions that you want to include with the integration.
A library extension does not define any actions. Here is a sample definition for a library extension:
{
  "schemaVersion" : "v1",
  "name" : "Example Library Extension",
  "description" : "Syndesis Extension for adding a runtime library",
  "extensionId" : "io.syndesis.extensions:syndesis-library",
  "version" : "1.0.0",
  "tags" : [ "my-libraries-extension" ],
  "extensionType" : "Libraries"
}
See also the sample library extension here: https://github.com/syndesisio/syndesis-extensions
Other than the lack of actions, the structure of a library extension is the same as the structure of a step or connector extension.
In a Maven project that creates a library extension, to add dependencies that are not available from a Maven repository, specify a system dependency, for example:
<dependency>
    <groupId>com.company</groupId>
    <artifactId>my-library-extension</artifactId>
    <version>1.0</version>
    <scope>system</scope>
    <systemPath>${project.basedir}/lib/my-library-extension.jar</systemPath>
</dependency>
Creating JDBC driver library extensions
To connect to a SQL database other than Apache Derby, MySQL, and PostgreSQL, you can create a library extension that wraps a JDBC driver for the database you want to connect to. After uploading this extension to Syndesis, the Syndesis-provided Database connector can access the driver to validate and create connections to the proprietary database. You do not create a new connector for your particular database.
The Syndesis open source community provides a project for creating an extension that wraps a JDBC driver.
Package one driver only in an extension. This makes it easier to manage the extension as part of managing your particular database. However, it is possible to create a library extension that wraps more than one driver.
To use the Syndesis project, you must have a GitHub account.
Ensure access to the JDBC driver for the database you want to connect to by doing one of the following:
Confirm that the driver is in a Maven repository.
Download the driver.
In a browser tab, go to https://github.com/syndesisio/syndesis-extensions
Fork the
syndesis-extensionsrepository to your GitHub account.Create a local clone from your fork.
In your
syndesis-extensionsclone:If the driver is not in a Maven repository, copy the driver into the
syndesis-library-jdbc-driver/libfolder.Edit the
syndesis-library-jdbc-driver/pom.xmlfile:Update the value of the
Nameelement to be a name that you choose for this extension.Update the value of the
Descriptionelement to provide helpful information about this extension.If you have copied the driver into
syndesis-library-jdbc-driver/libensure that thesystemPathinpom.xmlpoints to that driver file. Optionally change thegroupId,artifactIdandversionto reflect proper values according to the driver.If the driver is in a Maven repository, ensure that a reference to that Maven dependency is in the
pom.xmlfile.Examine the rest of the content of the
pom.xmlfile and change any relevant metadata as needed.
Execute
./mvnw -pl :syndesis-library-jdbc-driver clean packageto build the extension.
The generated .jar file is in the syndesis-library-jdbc-driver/target folder. Import this .jar file as an extension in Syndesis.
After you import a library extension, when you save an integration in Syndesis you can optionally select the imported library extension and associate it with the integration.